Highly Available NCP
20 August 2019
Have you ever wondered what would you do if your machine crashes and you don’t have access to your NextCloudPi data (and yes, you always forget to create a backup)? Or maybe if there is a way to connect your NCP with someone else’s on the same LAN and share your data? Then you should stay tuned and consider making your NextCloudPi highly available.
In order to make NextCloudPi highly available, emphasis should be given to the fundamental key of Nextcloud’s service: data storage. Thus, in our case high availability is equal to having replicated and persistent data over multiple machines running NextCloudPi docker image.
In this tutorial, we will use Docker Swarm and GlusterFS to achieve our goal. A brief summary of these two is given below:
-
Docker Swarm: Docker Swarm is a tool to create and maintain – or else orchestrate – a cluster of Docker hosts. Docker hosts are remote machines, either VMs or physical machines which are running the Docker Daemon. Swarm system is created by a node, named manager, who is actually the leader (multiple managers can be added to the system) and monitors the other nodes, called workers. The whole idea is about merging multiple machines into a single logical virtual server. By distributing an application over multiple Docker hosts instead of just one, we gain availability and high performance.
-
GlusterFS: GlusterFS is a distributed software based file system. In distributed systems, data is spread over different nodes but all of them have a common view point of all the files separated among them, which they can easily access without knowing the actual location of the file. The nodes that are running the GlusterFS daemon can get connected with each other into a cluster, where they can share a directory called brick, by mounting a volume – a logical collection of bricks – under a specified mode (distributed, replicated or striped).
Here’s how these tools will help us with our scenario:
Docker Swarm will deploy NextCloudPi stack and distribute ncp services over multiple nodes at a preferred scale, whereas joining all nodes of the swarm system together in a GlusterFS cluster will offer us replication and data persistence of the data storage.
The whole process is described below step by step, but you can also find an automation script at the end.
Input: Specify your resources
At the beginning, the script will prompt user to choose between several options about the resources that are going to be used.
First, user is prompted to choose if the script should get host’s IP automatically, or in case there are multiple IPs that the host is listening to, the user can specifically give one as input.
The automation script will also prompt user to choose between using existing machines as worker nodes or let it create new VMs through Vagrant.
-
Use existing machines: Choosing this option, the user will be asked to give as input IP and user (a sudoer) of each worker machine and also choose between either adding manually host’s public key to the authorized_keys files of each node or let the script fix it automatically. The latter will ask the user to provide password for each machine as input and also choose between using default public key (id_rsa) or specifying another one.Package sshpass is required to be installed at host’s machine for this option.
-
Vagrant Option: This option will let the automation script create automatically lightweight VMs according to a provided Vagrantfile. The user can manually adapt the specs of the VM to his needs, through the Vagrantfile. The new VMs will be given the following IPs of leader’s IP accordingly. Vagrant is required for this option.
Setting up Docker Swarm and GlusterFS on Manager
Now that we have all the information needed, the setting up of the system begins.
The Swarm system will be created by the host machine, which will be the system’s manager. For this example, let’s agree on host’s role being exclusively to monitor the worker nodes and not running a NextCloudPi instance. However, there will be a directory where all data of the GlusterFS cluster will be copied on host as well.
If you want host to be running NextCloudPi as well, skip setting the drain mode, add 1 to the scale up of NCP stack, make sure you deploy NCP stack before running Gluster’s container on host and replace swstorage directory with the respective directory of the shared volume on GlusterFS commands, like we do on workers.
After executing the following command, the Swarm system is ready to welcome new nodes:
$ docker swarm init advertise-addr
Now, it’s time to setup GlusterFS on host. We chose to use GlusteFS docker image for the automation script, in order to make it portable and applicable on every OS.
However, we should mention the insecurity that derives from the GlusterFS privileged container. Be careful with the sigint signals, as it may be handled by the container, but cause a host shutdown as well. A workaround would be installing GlusterFS natively on every node, but this is up to you, as it’s not automated.
So, the first thing to do is create an overlay internal network to be used by the GlusterFS cluster. This type of networking offers a distributed network among multiple Docker daemon hosts and combined with the attachable option, which allows us to use docker run to create a container within the scope of this network, we have the default networking of Swarm. The reason why we need this network, is because GlusterFS docker image demands privileged mode which is not compatible with Docker Swarm, and thus it cannot be deployed to Swarm stack. Therefore, we can only run Gluster as a service per node.
Execute the following command to create the overlay network:
$ docker network create -d overlay --attachable netgfsc
Next, we create some initial directories for GlusterFS container and do the appropriate mountings so that the volume can be shared:
$ sudo mkdir /etc/glusterfs
$ sudo mkdir /var/lib/glusterd
$ sudo mkdir /var/log/glusterfs
$ sudo mkdir -p /bricks/brick1/gv0

$ sudo mkdir swstorage
$ sudo mount --bind ./swstorage ./swstorage
$ sudo mount --make-shared ./swstorage
Each of these directories is explained below:
- /etc/glusterfs: Gluster configuration. Mounting this makes gluster configuration persistent on the host.
- /var/lib/glusterd: Gluster metadata. Mounting this makes gluster metadata persis- tent on the host.
- /var/log/glusterfs: Gluster logs. Mounting this makes gluster logs persistent on the host.
- /bricks/brick1/gv0: Volume to be shared – the actual location where GlusterFS stores files. It’s only used by glusterfs container.
- swstorage: Copy of the data volume shared among NextCloudPi replicas on the host.
And finally, let’s start Gluster’s container on host:
$ docker run --restart=always --name gfsc0 -v /bricks:/bricks \
-v /etc/glusterfs:/etc/glusterfs:z \
-v /var/lib/glusterd:/var/lib/glusterd:z \
-v /var/log/glusterfs:/var/log/glusterfs:z \
-v /sys/fs/cgroup:/sys/fs/cgroup:ro \
 --mount type=bind,source=$(pwd)/swstorage,\
 target=$(pwd)/swstorage,bind-propagation=rshared \
-d --privileged=true --net=netgfsc \
gluster/gluster-centos
About the GlusterFS container, as you can see it’s restart policy is set to always after exiting, so that the Gluster server is always alive to preserve replication and data persistence.
The automation script will execute some basic checks to know if everything works ok, and we’re ready to go on.
Extra services on host – optional
Before we proceed to the deployment of NCP stack, let’s run any services we need on host (later we will set host’s node to drain mode so we better run anything we need now).
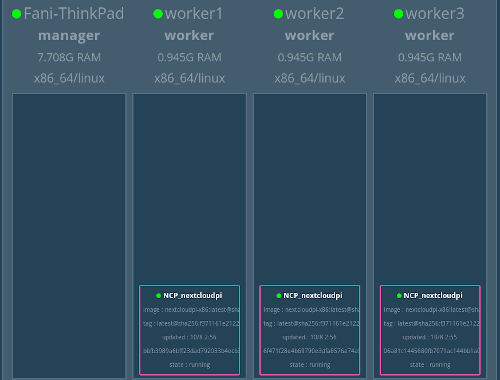
In order to get a clear picture of the Swarm system, there is a docker image which illustrates a visualizer and provides information about every node on the Swarm – status, services running, etc.
To get this visualizer, run the following container:
$ docker run -it -d -p 5000:8080 -v /var/run/docker.sock:/var/run/docker.sock dockersamples/visualizer
Now, just type localhost:5000 on your web browser and you should see something like this:
Workers on board
Time to welcome the remote machines, which will play the role of workers.
First, each machine should run the following command to enter the Swarm we created before:
$ docker swarm join --token $(docker swarm join-token -q worker) :2377
In order to automate this process, we enter each one of the remote machines via ssh and execute each command.
Then, we deploy NCP stack on host’s machine – manager – and then scale it up to the number of workers:
$ docker node update --availability drain $(hostname)
$ docker deploy --compose-file docker-compose.yml NCP
$ docker service scale NCP_nextcloudpi=<number of workers>
$ docker node update --availability active $(hostname)
The reason why we set manager to drain mode before deploying the stack is because we do not want it to run NextCloudPi. After the replicas are distributed to the workers, the manager can be set to active mode again.
All of our workers are now running NextCloudPi and all we need to do is sync their storage.
Using ssh again we will execute the following commands on each node to run GlusterFS container (the automation script uses gluster_setup.sh, which includes the commands below):
$ mkdir -p /bricks/brick1/gv0
$ mkdir -p /var/lib/docker/volumes/NCP_ncdata/_data/nextcloud/data/ncp/files/swarm
$ mount --bind /var/lib/docker/volumes/NCP_ncdata/_data/nextcloud/data/ncp/files/swarm /var/lib/docker/volumes/NCP_ncdata/_data/nextcloud/data/ncp/files/swarm
$ mount --make-shared /var/lib/docker/volumes/NCP_ncdata/_data/nextcloud/data/ncp/files/swarm

$ docker run --restart=always --name gfsc -v /bricks:/bricks \
-v /etc/glusterfs:/etc/glusterfs:z \
-v /var/lib/glusterd:/var/lib/glusterd:z \
-v /var/log/glusterfs:/var/log/glusterfs:z \
-v /sys/fs/cgroup:/sys/fs/cgroup:ro \
--mount type=bind, \
source=/var/lib/docker/volumes/NCP_ncdata/_data/nextcloud/data/ncp/files/swarm,\
target=/var/lib/docker/volumes/NCP_ncdata/_data/nextcloud/data/ncp/files/swarm,\
bind-propagation=rshared -d --privileged=true \
--net=netgfsc -v /dev/:/dev \
gluster/gluster-centos

$ docker start gfsc
The only difference between a worker’s GlusterFS setup and manager’s is that while manager mounts directory swstorage, the worker mounts a directory situated under /var/lib/docker/volumes because the directory we want to mount is the docker volume that NextCloudPi’s container is using, and it already exists because NextCloudPi is initialized.
So, now all nodes are running GlusterFS. But how do we connect them?
Creating the cluster and the replicated volume is manager’s job, so we enter gluster’s container on host and execute the following commands according to the number of workers we have:
$ docker exec gfsc0 gluster peer probe gfsc1
$ docker exec gfsc0 gluster peer probe gfsc2
$ docker exec gfsc0 gluster peer probe gfsc3
…
$ docker exec gfsc0 gluster volume create gv0 replica  gfsc0:/bricks /brick1/gv0 gfsc1:/bricks/brick1/gv0 gfsc2:/bricks/brick1/gv0 gfsc3:/bricks/brick1/gv0 # ( and so on if there are more workers…)
$ docker exec gfsc0 gluster volume start gv0
$ docker exec gfsc0 mount.glusterfs gfsc0:/gv0 $(pwd)/swstorage
All workers have to mount the volume also from their side, as follows (the automation script runs gluster_volume.sh per node):
$ docker exec gfsc mount.glusterfs gfsc:/gv0 /var/lib/docker/volumes/NCP_ncdata/_data/nextcloud/data/ncp/files/swarm
This is it! The volume is ready to be shared among the members of the Swarm system. There is one last thing to do though in order to make it visible to the web interface of NextCloudPi. Fix the owner group of the shared directory on every node like follows (this is also included inside gluster_volume.sh):
$ sudo chown www-data:www-data /var/lib/docker/volumes/NCP_ncdata/_data/nextcloud/data/ncp
$ sudo chown www-data:www-data /var/lib/docker/volumes/NCP_ncdata/_data/nextcloud/data/ncp/files
$ sudo chown www-data:www-data /var/lib/docker/volumes/NCP_ncdata/_data/nextcloud/data/ncp/files/swarm
Configure NextCloudPi
Both Swarm system and GlusterFS are now up and running. Everything that exists inside directory swarm is now replicated to all nodes.
What you have to do in order to see files coming from different nodes through the web panel, is enable auto scan (nc-scan-auto) for path ‘/ncp/files/swarm’, so that the files are visible as soon as they are copied to each machine. Otherwise, you will be able to see them only when you manually scan swarm directory (nc-scan).
Other features
Concurrent Docker downloads
If you’ve chosen the path of setting up the Swarm system manually and you’re using VMs on host as workers, then make sure that Docker daemon on host permits concurrent downloads of docker images. Set the limit up to the number of workers, in order to download GlusterFS image concurrently.
$ echo $"{
   "max-concurrent-downloads":<number_of_workers>
 }" | sudo tee /etc/docker/daemon.json
$ sudo service docker restart
Script docker_concurrent.sh will do help you fix this.
Extra nodes
After setting up the Swarm system you may realize that you need more nodes on it. You don’t have to break it down and set it up again, you can connect new nodes to swarm and GlusterFS cluster easily by following the next steps:
- On new machine, execute the same command we used before to add it to the Swarm system.
- On host, set manager to drain mode, scale up to num_of_workers + 1, set to active mode
- On new machine, setup GlusterFS and run Gluster container.
- On host, execute the following commands to add the new node to the cluster:
$ docker exec gfsc0 gluster peer probe gfsc
$ sleep 5
$ docker exec gfsc0 gluster volume add-brick gv0 replica gfsc:/bricks/brick1/gv0
- On new machine, mount Gluster’s volume and chown the new directory.
The above process is automated by the script extra_node.sh.
Automation script
You can find the automation script and its dependencies here.
Visually, the automation script works like this:
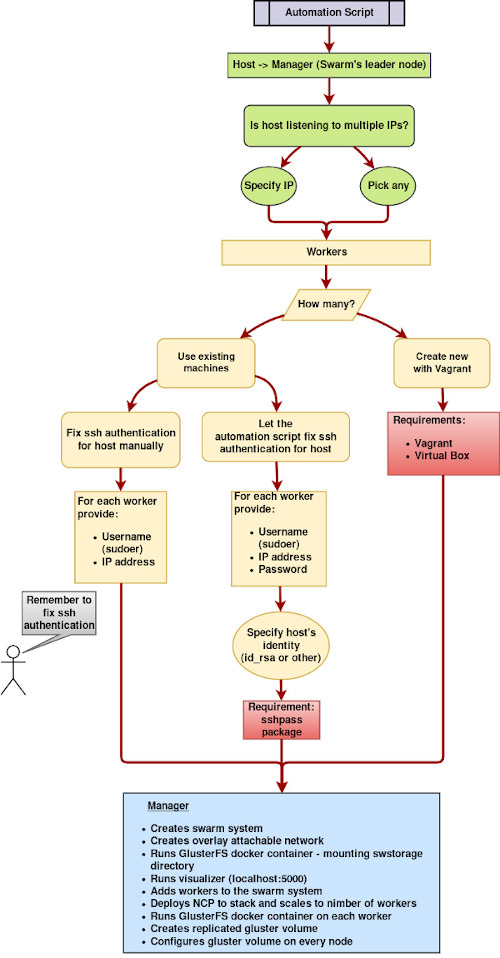
Just run create_swarm.sh and it will guide you through the whole process.
Happy clustering!