Travis on NCP
25 August 2019
It’s time for NextCloudPi to get adapted to the modern software development, Continuous Integration / Continuous Delivery. This is an implementation that should be done, in order to reduce risks for each build, automate the production and testing and clear the way to get valuable features out to users faster. Thus, one of my GSoC tasks was to create this missing feature.
If you’re trying to create a travis.yml file for a project like NCP, you’re also welcome to read this article, as I will go through the whole process till the final travis.yml.
The first thing I had to figure out was which CI/CD system to use. NextCloudPi project has a git repository on GitHub, which means that the choices among the CI systems were limited. The CI system that I finally decided to use was Travis CI.
Travis CI is a hosted continuous integration service used to build and test software projects hosted at GitHub. Travis is recommended for open source projects and is also cloud-based and supported by Docker to run tests, which in NCP case is important, since docker images exist as an alternative to arm images.
As of now, the .travis.yml that I created produces only NextCloudPi’s docker images (and its component docker images: debian-ncp, lamp and nextcloud) and not the native images, due to some issue I’m experiencing with the Locales.
One may wonder, why not use Docker automated builds then? It’s a fact that Docker itself is capable of automatically building images from github repos. However, it currently uses the stable version of Docker – thus, no experimental features are supported – and doesn’t allow to specify a certain Docker daemon. NextCloudPi’s Dockerfiles are using experimental features and therefore, using Travis CI to automate builds, is the best choice.
The .travis.yml I created is explained in the following image:
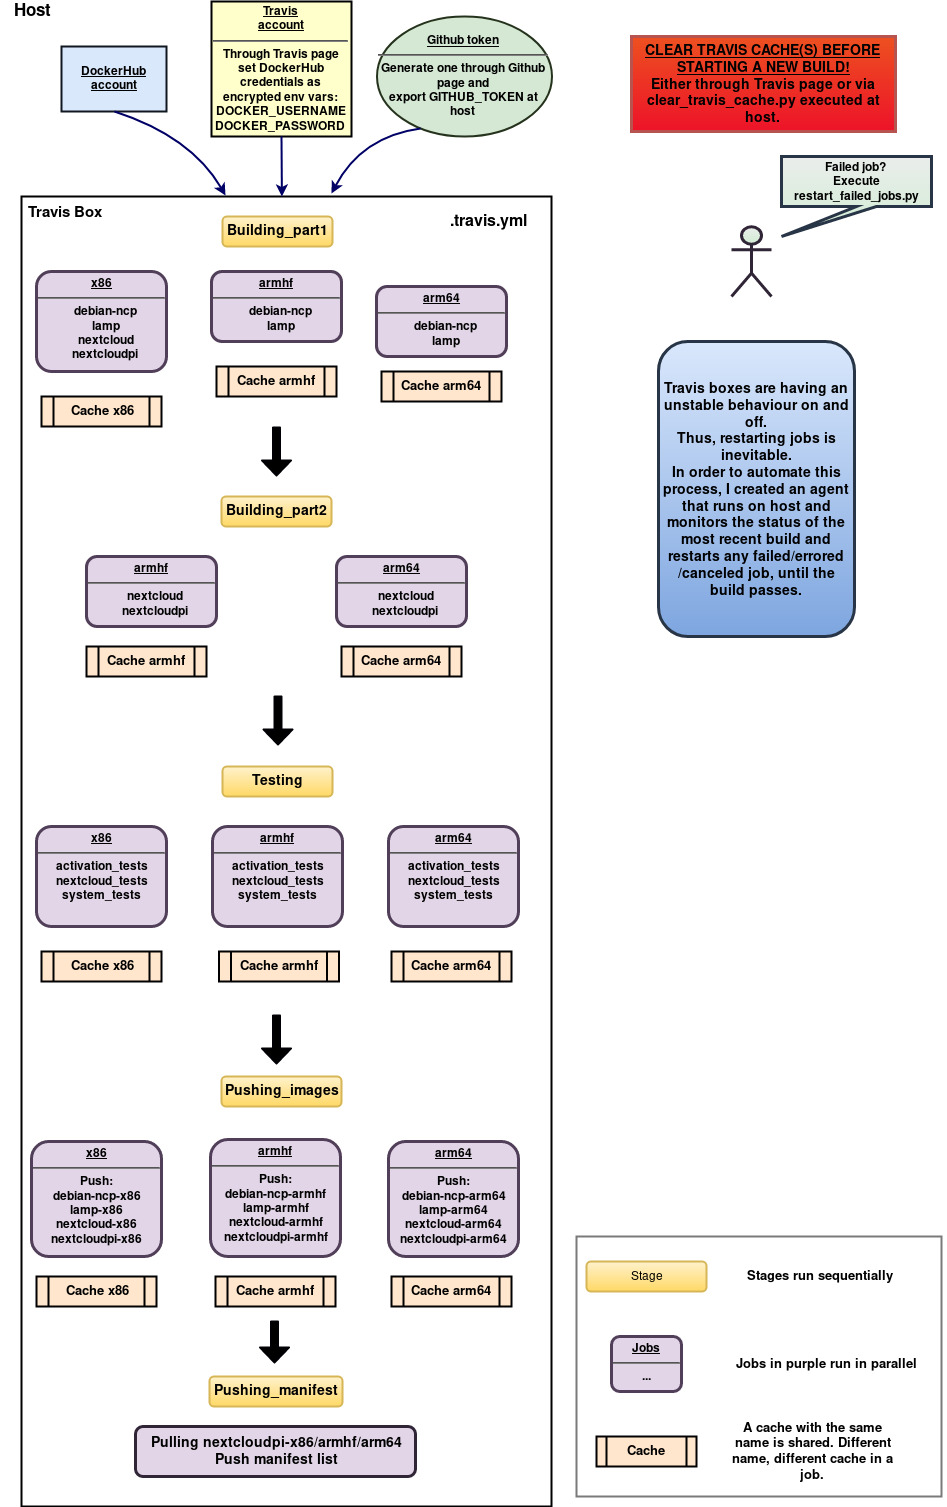
Let’s break it down and explain each step.
Briefly, what Travis really does is cloning your git repository and run the commands of travis.yml on a machine. You can specify some details about the machine that will be used, but the choices are quite limited.
The first thing to do in a travis.yml is specify some details about the machine and your work like: do you need sudo? what languages are you using? what OS you need? which branches of your repo should be checked?
In our case, we definitely need sudo and we picked the generic pack of languages which contains Docker and python and we’ll install anything else we need. As for the OS, Ubuntu xenial, was the best option at the time of writing the travis.yml file.
Also, it’s important to specify when should the Travis CI build take place. If you don’t specify this, it will just build on every single git commit you push. If you want it to build only when you tag a git commit – the so called build tags – then add the following line:
if: tag IS present
Now, let’s talk about the Travis ecosystem terms.
In Travis, a block of code can constitute a Job. A job contains commands that run sequentially, inside the same VM. There is one big limitation though about the time of a job’s execution: it should not exceed the limit of 50 minutes. After 50′ the job fails and thus, the whole build fails (if it’s not manually specified to ignore a job’s failure).
A job’s lifecycle splits up to the following parts (install and script are the most often used):
- before_install
- install: install any dependencies required
- script: run the build script
- before_script
- after_success/after_failure
- deploy
- after_script
These parts can be omitted. In our case, we use install for any packages required, script for the main work and sometimes the before_script to configure stuff.
Different jobs can run concurrently, within an entity called Stage. Stages – or as they are often called, Build Stages – can contain multiple parallel jobs and don’t have any time limit – except for the one of each job. Stages can only run sequentially among them. What’s of utmost importance to mention for stages, is that each stage runs on a fresh, independent VM.
What happens when you need to break your code down in stages (maybe due to the jobs time limit) but need some data from the previous stage to go on? Here comes the Cache. Travis offers a caching strategy which you can use to transfer your data from stage to stage. The cache can be defined as a directory, and inside it we can store data and the following stages will be able to access it directly.
Combining these concepts, I decided to split the travis.yml into 3 stages: Building docker images, Testing and Pushing to DockerHub. Each architecture is independent from the others, thus its docker image can have its own job inside every stage.
Every job/architecture is using its own cache so that the images built at the first stage can be transferred to the next stages (example of cache for x86):
env:
  CACHE_NAME=X86
Make sure that any parallel jobs in Travis should have distinct names for their cache, otherwise the same cache will be used and all processes accessing it will cause errors in your build!
Also, in every stage we install Docker with the convenience script because we need a recent release of Docker (at least 18.09), which supports the experimental features and Travis is not yet updating to this release automatically. A bash script like the following, will do the trick:
#!/bin/bash

set -o errexit

echo "INFO:
Updating docker configuration
"
curl -fsSL https://get.docker.com -o get-docker.sh
sudo sh get-docker.sh
echo $'{
  "experimental": true,
  "storage-driver": "overlay2"
}' | sudo tee /etc/docker/daemon.json
sudo service docker restart
After it, in order to enable the experimental features don’t forget to export the respective var:
export DOCKER_CLI_EXPERIMENTAL=enabled
Building docker images
At this stage, each architecture job will build the docker images needed for NextCloudPi: ncp-debian, lamp, nextcloud and nextcloudpi. Then they save the docker image in a tar file inside their cache.
Through this stage, I learned the hard way that Travis has much more limitations than the 50 minutes per job.
A job fails when there is no produced output for more than 10 minutes.. I solved this by adding the following line before any other command in the script section:
while sleep 9m; do echo "=====[ $SECONDS seconds, build-docker still building... ]====="; done &
Also, there is a limitation about the log output. So if you encountered an error that says “The log length has exceeded the limit of 4 Megabytes“, then guess what? You should produce output less than 4 MB. :’) In my yml, I just redirect the long command’s output to a file and if you want to monitor it just follow the output file using this command:
tail -f output &
The armhf images were struggling not to exceed the time limit and therefore, I split the Building Stage into two Stages: part 1 and part 2. Arm images build ncp-debian and lamp at part 1 (x86 is pretty fast so there is no need to split its stage) and in part 2, they load their lamp docker image and build nextcloud and nextcloudpi.
Lastly, I noticed that mysql was having trouble on starting properly as it was requesting more open files than the ulimit allowed. This shouldn’t be happening, as mysql usually calculates on its own the open files limit – the ulimit inside the docker container – but in Travis VM it didn’t (running the same docker images on my host, it worked just fine). So, what I did to solve this issue, was manually fixing the limit in mysql config file, via lamp.sh – using a sed command.
Testing
Finally, the building docker images jobs have passed and it’s time to test them using the headless tests provided by the nextcloudpi repository.
The requirements for this stage that had to be installed on Travis box were selenium and geckodriver – and of course since we have a fresh VM, Docker should be installed again.
The only image we need is nextcloudpi, so we load it and run the tests.
As soon as every job passes, this stage is complete.
Pushing to DockerHub
The last part of travis.yml focuses on pushing the docker images to DockerHub. They’re built and tested and ready to go public.
Each architecture will push its images and then we’ll create a manifest containing all the architectures.
Docker Manifest is a smart experimental tool which contains information about an image, such as layers, size and digest and extra information can be added by users like OS and architecture. This is why we often call manifest lists “multi-arch images”.
Manifest will need the nextcloudpi images of all architectures and thus, I decided to create separate stages: One for pushing the 4 components of nextcloudpi and one for pushing the manifest list of all architectures.
The first of these stages, loads the 4 images of each architecture per job, tags it and pushes it to DockerHub. The DockerHub credentials should be inserted through Travis page and in the yml use vars $DOCKER_USERNAME and $DOCKER_PASSWORD to login to DockerHub account and tag your image.
The last stage, needs one job only since all nextcloudpi images will be pushed together to the manifest list. Wondering which of the three caches will be used? None. The previous stage has pushed the images to DockerHub right? Why bother, waiting for any cache then? Just pull the images, login to Docker again and use docker commands manifest create and manifest annotate.
That’s it! The travis.yml is ready to be used. All you have to do is creating an account on Travis, associate it with Github, enable builds through Travis page, pass you DockerHub credentials and drop the yml we just created inside your repo as .travis.yml.
You can find the travis.yml I created for nextcloudpi here
Single architecture travis.yml
In order to provide an option for testing single architecture, or even pushing only one architecture to DockerHub, I created a script that generates mini travis.yml files for single architecture.
This script prompts the user to choose the architecture he wants and generates the respective file.
You can find it here
Extra tools
There are also some extra tools I created in order to automate the process of restarting failed jobs and cleaning the caches. You can read more about these tools here: Travis tools: Restart failed jobs and clean caches
